
TLS, SSL, HTTPS, RDP, Code Signing, etc - Security Certificates are necessary in some way/shape/form for almost every (legit) app/service/protocol out there. Developers (both the Infratructure Engineer variety and Software/Web variety) need a way to quickly and easily create Security Certificates for their particular development needs. While CloudFlare’s CFSSL is my current go-to solution for quickly generating two-tier PKI certificates (more on this in an upcoming post), I wanted an automated way to do the same with Windows Servers and PowerShell because I love me some PowerShell. Enter the MiniLab PowerShell Module!
About the MiniLab Module
MiniLab Module On GitHub:
https://github.com/pldmgg/MiniLab
MiniLab Module On PowerShell Gallery:
https://www.powershellgallery.com/packages/minilab/0.8.2
The general idea behind the MiniLab Module is to treat a Windows Domain as a platform and to create functions named after services that can be deployed to that platform. This means that a single function can be responsible for deploying one or more VMs/Containers depending on the needs/best practices of a particular service. One unique property of the MiniLab Module is that it makes use of Vagrant Boxes from:
https://app.vagrantup.com/boxes/search
(NOTE: The MiniLab Module does not actually install Vagrant on your machine.)
My favorites (and some of the defaults used for certain MiniLab Service Deployment functions) are:
- StefanScherer/windows_2016
- centos/7 (uses less than 1GB on disk <3)
- jborean93/WindowsServer2016
Since almost every service (that I can think of) needs Security Certificates of some sort, this post will focus on the function ‘Create-TwoTierPKI’. (Being able to genereate appropriate Security Certificates is a requisite for most other Service Deployment functions in the MiniLab Module, so it makes sense to start here.)
Deploying Two Tier PKI To Your Windows Domain
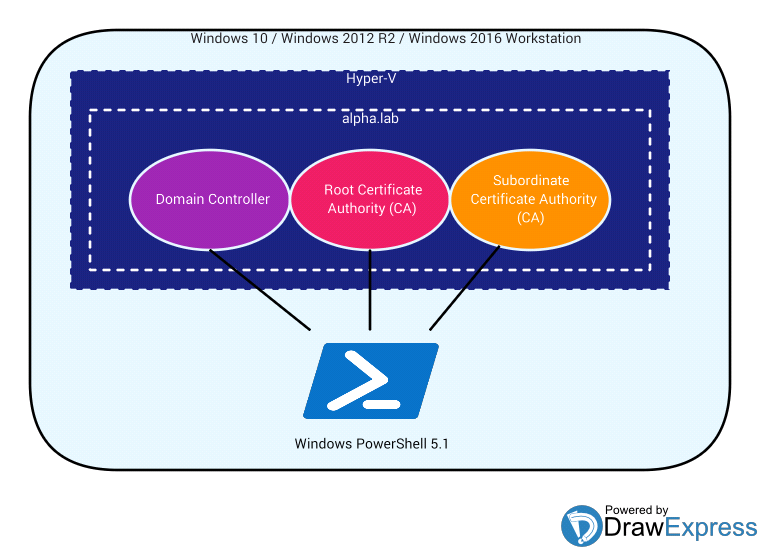
For VM / Container deployment the MiniLab Module uses Hyper-V, so make sure you’re logged into a physical Windows 10 Pro/Enterprise, Windows 2012 R2, or Windows 2016 machine. Also, make sure you have an Internet Connection (for downloading Vagrant Boxes), at least 100GB of free space on a local hard drive, and at least 12GB of memory readily available (i.e. not currently in use).
Service Deployment functions are modular in the sense that they’re easy to deploy to an existing Domain, but since I’m just some guy on the internet, you might be more inclined to try the ‘Create-TwoTierPKI’ function on a brand new test Domain. So, to make this happen, all you need to do is launch Windows PowerShell 5.1 (Run as Administrator) and…
$VagrantVMPassword = ConvertTo-SecureString 'vagrant' -AsPlainText -Force
$VagrantVMAdminCreds = [pscredential]::new("vagrant",$VagrantVMPassword)
$NewDomainAdminCreds = [pscredential]::new("alpha\alphaadmin",$(Read-Host 'Enter Password' -AsSecureString))
Enter Password: ************
$LocalAdminAccountCreds = [pscredential]::new("Administrator",$(Read-Host 'Enter Password' -AsSecureString))
Enter Password: **************
$CreateTwoTierPKISplatParams = @{
    CreateNewVMs                            = $True
    VMStorageDirectory                      = "H:\VirtualMachines"
    NewDomain                               = "alpha.lab"
    PSRemotingCredentials                   = $VagrantVMAdminCreds
    DomainAdminCredentials                  = $NewDomainAdminCreds
    LocalAdministratorAccountCredentials    = $LocalAdminAccountCreds
}
Create-TwoTierPKI @CreateTwoTierPKISplatParams
…Wait approximately 2.5 - 3.5 hours (depends on a lot of factors in your local environment) and your new Domain Controller, Root Certificate Authority, and Subordinate Certificate Authority (including ADCS Website at https://pki.alpha.lab/certsrv) will be ready. If you want to knock about an hour off of the wait time or if you’re a bit more resource contrained (i.e. only ~70GB of free space on a local hard drive and only 8GB of readily available memory), then you can use the -DCIsRootCA switch…
$CreateTwoTierPKISplatParams = @{
    CreateNewVMs                            = $True
    VMStorageDirectory                      = "H:\VirtualMachines"
    NewDomain                               = "alpha.lab"
    PSRemotingCredentials                   = $VagrantVMAdminCreds
    DomainAdminCredentials                  = $NewDomainAdminCreds
    LocalAdministratorAccountCredentials    = $LocalAdminAccountCreds
    DCIsRootCA                              = $True
}
Create-TwoTierPKI @CreateTwoTierPKISplatParams
So let’s quickly break down what’s going on with these parameters.
-
CreateNewVMs - Use this switch when you intend to deploy a service using new VMs (as opposed to existing servers standingby on your network). For functions other than ‘Create-TwoTierPKI’, this could also mean new Docker Containers.
-
VMStorageDirectory - This is just a full path to the directory on a local hard drive that contains all VM-related files for all of the VMs required for the new service.
-
NewDomain - The name of your new domain. This parameter’s counterpart is -ExistingDomain, which would be used (alongside parameters referring to IP Addresses of existing servers that you would like to turn into Root and Subordinate Certificate Authorities) if you want to integrate Two Tier PKI with an existing Domain.
-
PSRemotingCredentials - This PSCredential should grant access to ALL VMs that will be used to establish the new service. In this example, since we’re deploying Vagrant VMs, we know that we can use UserName ‘vagrant’ and Password ‘vagrant’.
- DomainAdminCredentials - In this example, a new Domain Controller will be established on a Windows 2016 Vagrant VM using PowerShell Desired State Configuration (DSC). A new User Account will be created in Active Directory using the credentials provided to this parameter. This user will be added to the following Security Groups and subsequently used to establish the Root and Subordinate Certificate Authorities:
- Domain Admins
- Domain Users
- Enterprise Admins
- Group Policy Creator Owners
- Schema Admins
-
LocalAdministratorAccountCredentials - Since this example creates a new Domain Controller, we must ensure that the local Built-In Administrator Account has a password before we try to create the Domain Controller. The local Built-In Administrator Account will have its password set to whatever is provided in this PSCredential. If you are using a Vagrant VM as your new Domain Controller, this parameter is manadatory because Vagrant VMs specifically set the local Built-In Administrator Account password to null. (Make sure the password you use meets minimum complexity requirements!)
- DCIsRootCA - Using this switch installs and configures the Root CA on the same server as the Domain Controller. This means that you’ll end up with 2 instead of 3 servers.
At this point, you’ll have a new Domain called ‘alpha.lab’ on your network. However, you most likely will not be able to resolve this new Domain from your current workstation via…
nslookup alpha.lab
# OR
Resolve-DNSName alpha.lab
…so be sure to update your network’s DNS with a Forward Lookup Zone or Conditional Forwarder entry pointing to the IP Address of alpha.lab’s Domain Controller.
Time to Create Some Security Certificates
The MiniLab Module comes with a function called ‘Generate-Certificate’ that will actually handle getting new Security Certificates from the Windows Subordinate/Intermediate/Issuing Certificate Authority. I happened to need a TLS Certificate for my new Hashicorp Vault server (more on this in a future post). So I used the ‘Generate-Certificate’ function as follows:
$ADCSWebCreds = [pscredential]::new("alphaadmin",$(Read-Host "Enter Password" -AsSecureString))
Enter Password: ************
$GenCertSplatParams = @{
    CertGenWorking              = "$HOME\Downloads\VaultServerTLS"
    BasisTemplate               = "WebServer"
    ADCSWebEnrollmentURL        = "https://pki.alpha.lab/certsrv"
    ADCSWebAuthType             = "Windows"
    ADCSWebCreds                = $ADCSWebCreds
    CertificateCN               = "VaultServer"
    Organization                = "My Company"
    OrganizationalUnit          = "DevOps"
    Locality                    = "Philadelphia"
    State                       = "PA"
    Country                     = "US"
    CertFileOut                 = "VaultServer.cer"
    PFXFileOut                  = "VaultServer.pfx"
    CertificateChainOut         = "VaultServerChain.p7b"
    AllPublicKeysInChainOut     = "VaultServerChain.pem"
    ProtectedPrivateKeyOut      = "VaultServerPwdProtectedPrivateKey.pem"
    UnProtectedPrivateKeyOut    = "VaultServerUnProtectedPrivateKey.pem"
    SANObjectsToAdd             = @("IP Address","DNS")
    IPAddressSANObjects         = @("192.168.2.111","0.0.0.0")
    DNSSANObjects               = "VaultServer.alpha.lab"
}
$GenVaultCertResult = Generate-Certificate @GenCertSplatParams
All output (including your new Security Certificate) will be written to ‘$HOME\Downloads\VaultServerTLS’. Please note that if you use the ‘Generate-Certificate’ function from a host that is already joined to the ‘alpha.lab’ domain, you will not need to use the -ADCSWebEnrollment, -ADCSWebAuthType, or -ADCSWebCreds parameters (as long as you are logged in as a Domain Admin).
And there you have it! Easy peasy!
Next Post Teaser
How to do all of the above in 20 minutes (as opposed to 3 hours) using CloudFlare’s CFSSL and Docker Containers!